Pre-installation preparations
Install Python 2.7.x and pip
Windows – instructions and downloads are available at python.org
Linux – likely to be installed already except on newer distributions
Check by typing
python -V- if the response isPython 2.7.x(x can be any number) then move on to installing pip.If the response is that the command can’t be found, you will need to install Python. On Ubuntu, Python 2.7 is python and Python 3.x is Python3:
sudo apt-get install python
Add Python and the scripts folder to the path
Windows only – this is usually automatic in linux
During the Windows Python 2.7 installation, ‘install’ Add Python.exe to Path:
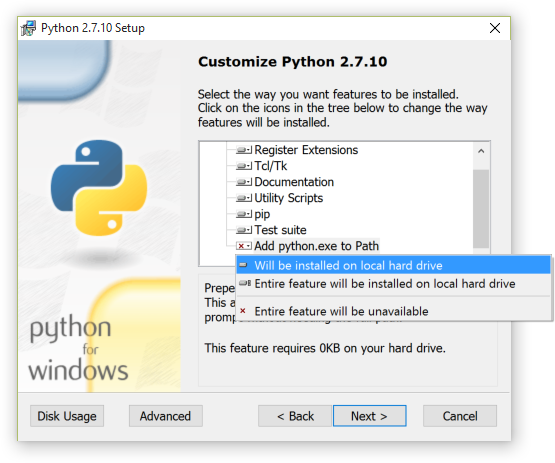
Python installation customisation dialogue
If Python is already installed, you can add Python to Path yourself:
Add the following to the end of the
pathenvironment variable (to see how to edit the environment variables, see http://www.computerhope.com/issues/ch000549.htm):;C:\Python27\;C:\Python27\Scripts\
Python package installer pip
Install pip – for details go to https://pip.pypa.io/en/latest/installing/. The quick version is as follows:
Linux
Download the latest version using the same method as for Windows, or get the version in your package manager, for example:
sudo apt-get install python-pip
Windows
Pip is normally installed with Python. If it hasn’t been, download the installer script get-pip.py and save it locally – right click and Save link as… or equivalent.
Open a command window (Start menu, cmd.exe) and navigate to the place you saved the get‑pip.py file:
python get-pip.py
Quick check of python and pip
To check everything is installed correctly so far, type the following in a command window/shell. You should have the version number of pip returned to you:
pip -V
Install RabbitMQ
- Linux - Follow the guide at http://www.rabbitmq.com/install-debian.html
- Windows - Follow the guide at http://www.rabbitmq.com/install-windows.html
For either install, just follow the defaults – no special configurations required. Please note that RabbitMQ requires that Erlang is installed first, as described in the above links.
Note
If you encounter problems running RabbitMQ as a service under Windows then try the following:
Create a folder called
c:\rabbitmqFrom an administrator command prompt run Advanced System Properties by typing
sysdm.cplCreate a new system environment variable called
RABBITMQ_BASEand set its value toc:\rabbitmqIn the command prompt navigate to the folder containing the RabbitMQ commands and run:
rabbitmq_service.bat remove
rabbitmq_service.bat install
rabbitmq_service.bat start
Note
Before continuing, consider virtualenv
Install NumPy
Numpy is required for charts.
For Linux and Windows - activate virtualenv first:
pip install numpy
Install PostgreSQL database
For production use, you will need to install and configure a database. We strongly recommend PostgreSQL, but you can use any of the databases listed on the Django website such as MySQL, Oracle or MS SQL Server, with the limitations listed there. There is one additional limitation - the calculation of median values for charts in OpenREM is dependent on using PostgreSQL.
If this is your first time installing OpenREM and you just want to test it out, you can skip this step and make use of the in-built SQLite database. However, you should expect to start again when you move to a production grade database.
Install a DICOM Store service
To have modalities send DICOM objects to your OpenREM server, or to use query-retrieve from a PACS, you need to install a DICOM Store service. For testing, you can make use of the DICOM Store OpenREM can provide. However, because this is not stable over longer periods of time we recommend using a third-party DICOM Store service. You can use any one you like, as long as it can be scripted to call OpenREM scripts when DICOM objects are received. We recommend Orthanc or Conquest for this and provide details of how to configure them in the Third-party DICOM Stores section.
Orthanc
- Ubuntu users:
sudo apt install orthanc - Windows users: Download from https://www.orthanc-server.com/download-windows.php after filling in the form
- Configuration instructions can be found in the Third-party DICOM Stores section.
Alternative - Conquest
Download Conquest DICOM server from https://ingenium.home.xs4all.nl/dicom.html
Install using the instructions included in the download - there is a PDF with Windows install instructions and general usage instructions, and another PDF with Linux install instructions. The guides in Third-party DICOM Stores should be consulted when making configuration decisions.
Alternatively, Ubuntu 16.04 users can use the following instructions:
Unlike with the database, it is possible to change DICOM Store service at a later point.
Resources for creating RDSR for older Toshiba CT scanners
New in version 0.8.0
If you need to import data from older Toshiba CT scanners into OpenREM then the following tools need to be available on the same server as OpenREM:
- The Offis DICOM toolkit
- Java
- pixelmed.jar from the PixelMed Java DICOM Toolkit
For more information see For CT dose summary files from older Toshiba CT scanners. The locations of these executables needs to be configured in the
local_settings.py - see Toshiba CT RDSR creation.
Install OpenREM
You are now ready to install OpenREM, so go to the Installing OpenREM docs.
Further instructions
Virtualenv and virtualenvwrapper
If the server is to be used for more than one python application, or you wish to be able to test different versions of OpenREM or do any development, it is highly recommended that you use virtualenv or maybe virtualenvwrapper
Virtualenv sets up an isolated python environment and is relatively easy to use.
If you do use virtualenv, all the paths referred to in the documentation will be changed to:
- Linux:
vitualenvfolder/lib/python2.7/site-packages/openrem/ - Windows:
virtualenvfolder\Lib\site-packages\openrem
In Windows, even when the virtualenv is activated you will need to call python and provide the full path to script in the Scripts folder. If you call the script (such as openrem_rdsr.py) without prefixing it with python, the system wide Python will be used instead. This doesn’t apply to Linux, where once activated, the scripts can be called without a python prefix from anywhere.